So we’ll start things off here with a first post I’ve been meaning to put together for quite awhile … just haven’t had a blog to post it to. So I’m going to break down here the details of my Homelab. This will also include a build of materials for all the different “stuff” needed to make it a reality. I hope it can help and/inspire your future builds or improvements to your current setup.
Let’s start off with the hardware side of things. Below I’ll break out each of the pieces of hardware as seen in the image above. I’ll save the cool stuff running on these systems for Part 2 to outline just the software aspect of things. Please keep in mind that all of the headings are clickable to bring you to appropriate links to get yourself said hardware. Please keep in mind that I do not run ads on this blog, but I do use affiliate links. So please use the links when possible to help me out with running things and sharing my awesome info with you!
Hardware
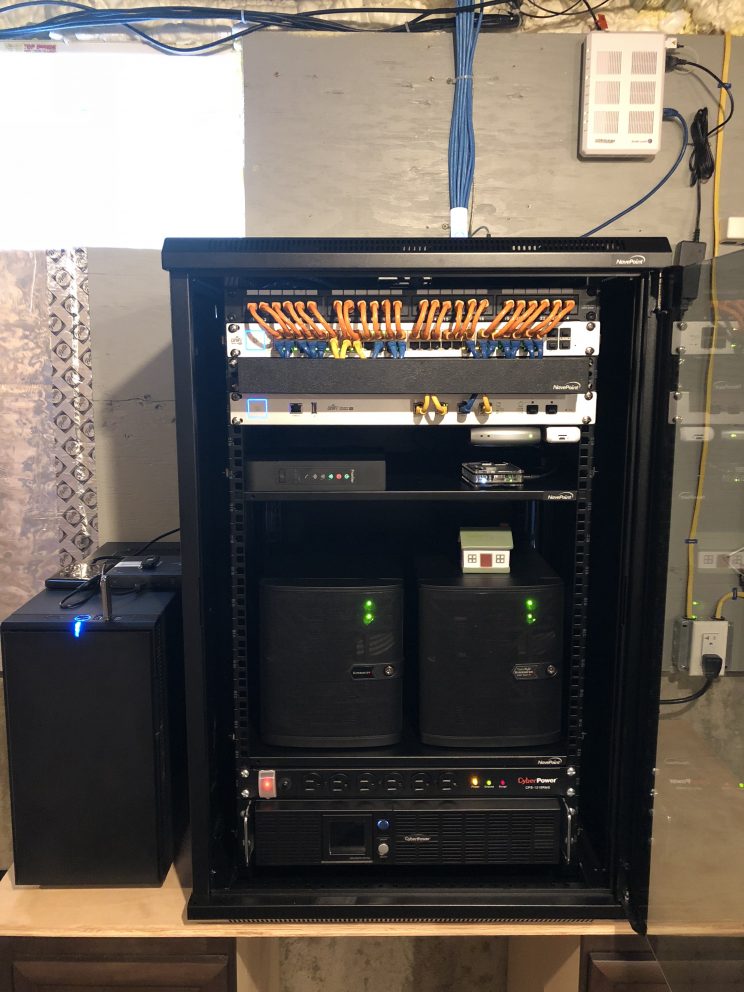
(From bottom to Top)
Navepoint 18U Rack
I chose this rack for its specific sizing and build quality. While I don’t think the idea of hanging this thing fully loaded on a wall would work out very well, some people have done it. I was looking more to find a rack that was somewhat low impact in size in its basement location. The depth is only about 30” in depth, meaning it’s much less than a full size standard rack. Little snafu I ran into originally in that the shelves wouldn’t fit the larger spacing I was using, but that aside it’s a solid rack. I really like the solid feel and build.
CyberPower UPS
This was simply a sizing exercise. I was shooting for something that could handle my network and internet infrastructure in case of a power loss. This way we could still continue to go online, browse, etc. It turns out not only can it handle that load, but I’m now actually running ALL of the hardware off it with a run time of roughly 45-50 minutes. I’m still working through some of the power scripting control with the use of some USB replication tools. More on that another day.
CyberPower Power Strip
Basic, but does the job. The reason I like this one was that it provides power in both the front and the rear. So some devices plug into this which then plugs into the UPS. It also allows easy access in the front for times when I may need to load something in ad-hoc.
SuperMicro SuperServers
These are my small but powerful little workhorses. Many who start getting into ESXi builds start with the tower like servers or just go full boar and get the rack mounted 1-3U boxes. These little guys pack a serious punch in a small form factor. Kudos and credit go to Paul Braren @ TinkerTry for introducing this magical device to me.
Small side story here about how these came to be. The initial box (Loki) was built as I wanted to have an ESXi host at home for all sorts of tinkering. After reading up on the specs and detailed builds from Paul, I set out and acquired my desired build. Just about a year ago however, I was attending a local VMUG in CT. Paul (who now works for VMware) was there in a non VMware-official role showing off his superserver data center in a box build. There happened to be a wonderful raffle to win … you guessed it … another SuperServer!! So as you can probably guess, that is where the second system came from.
For the full build details on these, I’ll refer you to this post on Paul’s site: https://tinkertry.com/connecticut-vmug-usercon-2018-homelab. The latest is obviously of the build outlined, but the older one is very similar - just missing the NVMe based storage option. I loaded the older (Loki) with 2x500GB SSD and 2x2TB SATA drives I had. While the newer (Thor) was loaded with just 1x1TB SSD and 4x2TB leftovers from my upgrade on the unRAID server (below).
All in, this leaves me with 2 x ESXi Hosts with 16 logical procs (~17Ghz of CPU), 64GB of Memory, and 1TB of Flash based storage (one with an extra kick of NVMe). It’s a pretty robust little setup which can easily have the memory expanded (the most heavily utilized item!).
Rock64
This little powerhouse, is my segregated system to serve 1 main purpose - smart home automation. I’ll discuss this a bit more in the software section, but this little guy is pretty powerful for its size. I am looking to move the piHole function over to this as well soon, but I think that will happen after they launch the new revised version. Again, more on that in Part 2.
HDHomeRun
We’re cord cutters, and one of the first options on the cord cutting route was a local antenna to receive over the air (OTA) broadcasts. They’re in HD and SD for the most part. Reception isn’t fantastic in our area, but we get some. This device allows me to watch those streams on various devices that can stream from it. Specifically, I have Plex running with it’s DVR function so that we essentially have a DVR function running off the OTA broadcasts for free. The latest Plex enhancements to the guide make it feel just like a regular TV service.
Ubiquiti Unifi CloudKey
I battled with this for awhile before finally deciding to get the hardware to host my Unifi SDN Controller. If you aren’t familiar with SDN, you should probably check the google. In the end, I decided I wanted to have actual dedicated hardware for something as important as the controller for my network infrastructure. It makes for an easier way to back it up, if something goes wrong on another hosted system it won’t botch the controller, and its the most direct path to controlling the hardware its plugged into.
Ubiquiti Unifi Security Gateway (USG4Pro)
This is actually one of the latest upgrades. I was utilizing the USG3 previously, but needed to upgrade to the Pro so that enabling the IDS/IPS wouldn’t hinder my internet speeds. This is a replacement for your typical router, enabling much more granular controls and overall a more enterprise like experience. It also rack mounts, so its a little nicer than another item on a shelf.
Ubiquiti Unifi PoE 48 Port Switch (USW-48-500W)
This came in the latest round of upgrades as well. I used to work with one 16-port Unifi USW with PoE, and additionally an older 24-port Netgear Gig switch. Unfortunately it was just extra space taken, and I was just pressing the limit on available ports. This new 48 port gave me some breathing room, unified management, PoE, and a single U beast of a device. One of the most expensive parts of the the whole array thus far, but totally worth it!
Ubiquiti Unifi UAP-AC-PRO (Not pictured)
While these are not shown or pictured here (2 of them in fact!), they are obviously mounted inside other regions of the house to provide wifi coverage. While I didn’t have any major problems with the previous wireless setup, I wanted to give these a go to ENSURE we had no issue in this house and to get a better grasp on wireless. While I could do some great advanced things running Tomato on my old Asus Dark Knight … this is a whole new world with these bad boys. The amount of tuning, granularity, and overall coverage has just been nothing short of fantastic.
Monoprice 24 Port Patch Panel
This one is simple and straightforward. Though I will say in the future I would love to go with a keystone based patch panel. I realized post-haste the amount of flexibility I could truly have configured here - putting the USB terminals, coax, and ethernet would have been nice. It also means it’s a lot easier when I need to make changes since I could literally just move a wire in order to another port. I digress …
2x USB Extension Terminals
This is simply an organizational matter. I like having these terminate externally for troubleshooting, and the off chance I need to add something to my smart home configuration. Out of one of these, is the ZStick (outlined below), and the second is a USB cable that runs to a device that integrates with the alarm system (AD2USB - outlined below).
Aeon ZStick
This has been a wonderful little device I discovered along the route to my current home automation setup. I started in the land of Vera (micasaverde ZWave hub), and eventually found this guy. It’s a fairly cheap device to communicate with your ZWave enabled smart devices. It’s simple, straightforward, and gets the job done for all my ZWave needs thus far.
AD2USB (Not pictured)
This is a marvelous little device I discovered when purchasing my first home and deciding to wire it up to be smart. The Ademco Vista based alarm system is what we decided to have installed and in the process I discovered this device could talk on the alarm bus as if it was a keypad! So a little bit of configuration with the smart home controller, and presto we have a “virtual” alarm keypad that can operate my alarm. A few little scripts and we can automatically arm/disarm the alarm at will. Alexa, turn on the alarm. You get the idea!
Storage Server (unRAID)
This is the central brain of the network. At this point it runs much of the functionality as a “server” would for most setups. It also houses the massive storage target (currently as of this writing 32TB) that is used to hold everything from backups, to media, to this blog! It was originally built to run FreeNAS as a pretty beefy box, but has since been broken down to do my bidding as a storage box and running about 30 docker containers on the regular. Hardware here is a bit outdated, so I won’t go into detail unless folks are really that intrigued (leave a comment!). I’ll put the basic highlights here in a short list:
- CPU - Intel Xeon E3-1230 3.3G Quad w/ HT (8 logical)
- Memory - 16GB ECC DDR3 1333
- Disks - 4 x WD Red 8TB (shucked from BestBuy EasyStores), 4x WD Red 4TB (OEM purchased), 2x 500GB SSD (SanDisk based, whatever was cheapest!
So that about does it for the hardware portion of the virtual tour. The second post will come a bit later as I work to outline all the software and apps running amongst this hardware setup. If you have any questions about configurations, setups, or just want to tell me how much you like or dislike what you see, be sure to drop something in the comments below!